
Windows only allows you to extend an existing partition if there is free unallocated space directly next to it. This is most noticable when you try to extend the C:\ drive but the option isn't available.
The reason it doesn't work is because Windows by default whether its the client or server versions is that it creates 3 partitions, a boot partition, the OS itself and a recovery partition.
It looks like this: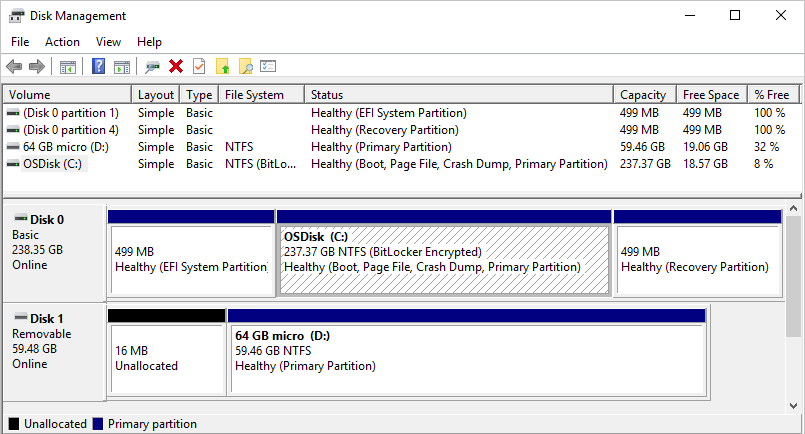
If you add more space to the disk for via VMware for example the unallocated space is assigned next to the recovery partition.
To start extending, you can do two things
- Delete the recovery partition, this however removes the ability for you to boot into the recovery part of Windows and you will always need a ISO to perform any recovery actions.
- Move the recovery partition to the end of the disk with a third party tool
The prefered option is option 2 and this is how you do it
- Make sure the disk is already has the unallocated space added to it
- You will need the GParted Live CD to move the partition, you can download it here
- Mount the Live cd and boot from it
- On the boot screen, select GParted Live (Default Settings) option
- On the keymap question, select Don't touch keymap
- On the language question, select any language you want, the default is 33 US English
- For the Video question, select option 0, this will ensure it boots with a GUI
- Once booted, it should automatically start Gparted with /dev/sda as the selected drive even if you have multiple. SDA is the disk with your operating system in almost every case.
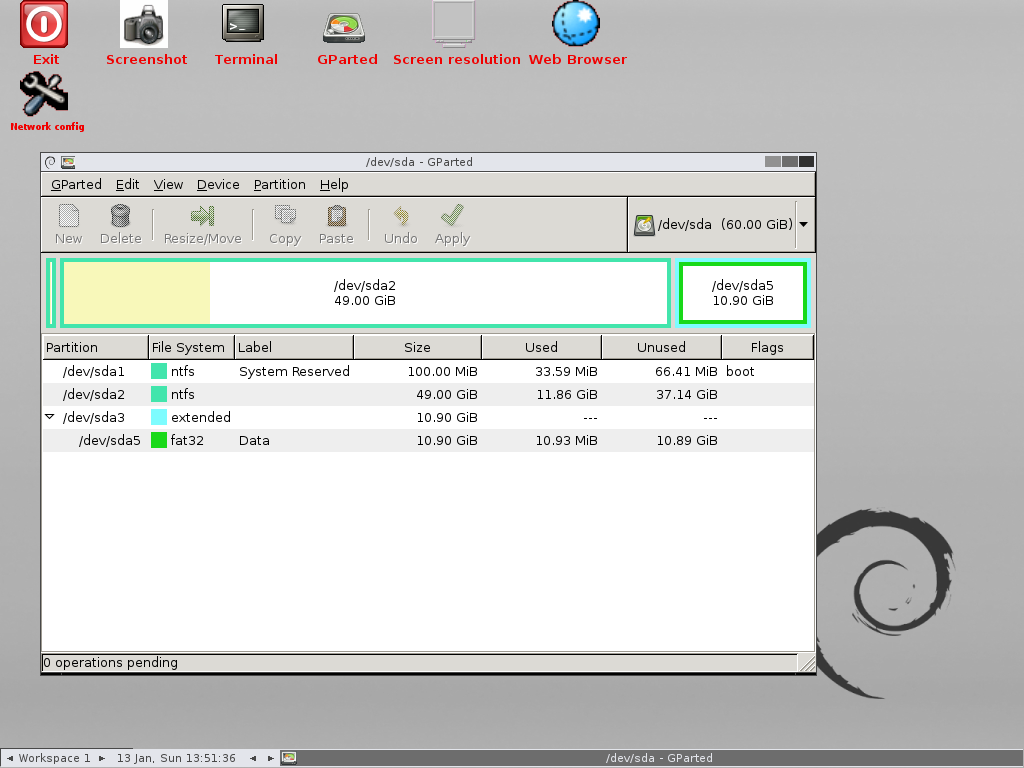
- Unlike the picture above, it should show 3 partitions, 2 tiny slivers representing the boot and recovery partition, 1 large one the OS and the last one containing your unallocated space.
- Right-click on the sliver on the right side of the OS partition, this is the recovery partition. Select Resize/Move
- In the Free space following (MiB) field type in 0, this moves the partition to the end of the disk because you just told it there should be no space after this partition. Click on the Resize/Move button to save the setting.
- On the top you'll find the Apply button (green checkmark) click on it to apply the configuration. Acknowledge the warning.
- You can now choose to continue to extend the partition with Gparted or with Windows. If you choose to do it with Gparted, simply start the Resize/Move again but fill in the New size (MiB) field and apply it.