
I don't know if this is common with other companies, but it is where I work. People leave the company for various reasons, but sometimes they forget to set an Out of Office.
I don't keep track of this, but their teamlead/manager does and I get asked the question: "Can you check if Jane/Joe has his Out of Office set that he's no longer working here?"
Lazy as I am and don't want to login into the Exchange ECP portal everytime, I developed my own tool so I can quickly check this and change the message and timeframe when needed.
The code for this application can be found here: https://github.com/MoebiusZero/SetOOF
The application is written in C# with and doesn't require a admin login to make the changes. It requires a App Registration in Azure AD to verify itself.
To create one, do this:
- Login to your Azure Portal (https://portal.azure.com)
- Go to Azure Active Directory
- Go to App registrations
- Click on New Registration
- Give your new application a name
- For supported account types, if you require users to login to your application select Personal Microsoft Accounts only, for my use case I selected Accounts in this organizational directory only
- You can leave Redirect URI empty as this application doesn't talk back.
You have now created a App registration, but before the app can validate with Azure AD you will also need a Client ID and Secret, create one like this:
- On the page with your newly created App registration, go to Certificates & Secrets
- Click on the tab Client secrets
- Click New client sercret
- Give it a description so you easily recognize for what it is used for and a expiration date.
- Take note of the Value field and Secret ID field
The app requires specific permissions to be able to read and write the users Out of Office settings. To set these settings do this:
- On the page with your newly created App registration, go to API permissions
- Click on Add a permission
- Click on Microsoft Graph
- Click on Application permissions
- Search for and add the following permissions
- MailboxSettings.Read
- MailboxSettings.ReadWrite
- User.Read
- User.Read.All
- Click on Grant admin concent for (Tentant Name)
This allows the app to read the settings for example the Out of Office for the user and to find the user based on the selection, the app also requires User.Read permissions.
Now you are all set to configure the application. Open the file in Visual Studio and all you need to do is configure the bearer token function
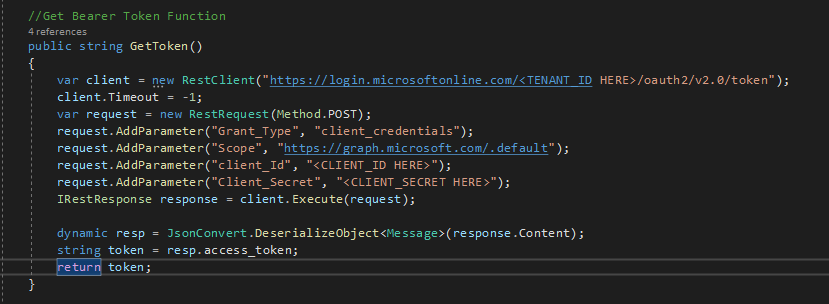
You'll find two parts here at Client_ID and Client_Secret where you need to fill the values of the App registration when you created a secret.
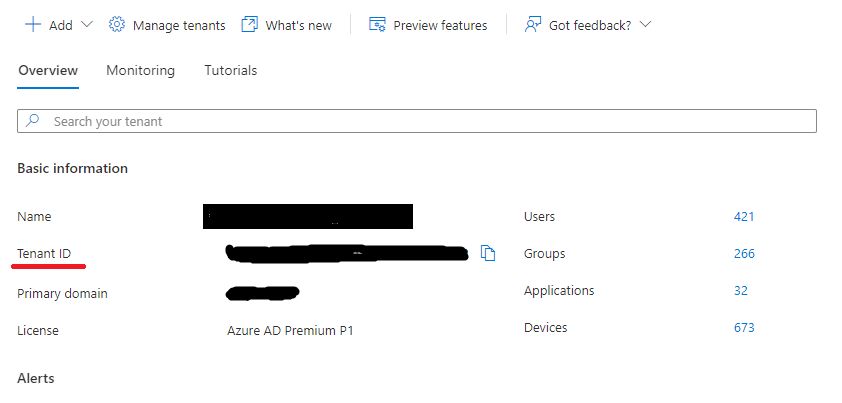
Next you need to find your Tenant ID, otherwise the app will not know where to connect to. You can find the tenant ID in the overview of the Azure Active Directory Page
Once found, you can fill it in URL found in the var client line.
Once done, build your App and test if it works!